In this AMAZING RESTORATION video I exceeded all my expectations on how good this would look when it was finished. This is my favourite restoration so far and I love it.
SUPPORTING THE CHANNEL: https://www.buymeacoffee.com/mayfieldreM
AMAZON WISHLIST: https://amzn.to/3cirnVl
ETSY SHOP: https://www.etsy.com/uk/shop/MayfieldRestorations
FACEBOOK: https://www.Facebook.com/mayfieldrestorations
INSTAGRAM: https://www.instagram.com/mayfield_restorations/
Karcher WD 6 P PREMIUM Shop Vac – Direct from Karcher Website
Festool Rotex 90 Sander – https://amzn.to/3MlGGcK (UK) https://amzn.to/3703LBO (CAN)
Dewalt 5-Inch Sander – https://amzn.to/3hxvYSs (UK) https://amzn.to/3vAakoJ (US)
Wagner Flexio 590 Sprayer – https://amzn.to/3XrY3yq (UK)
https://amzn.to/3tL6QO4 (US)
Bahco Carbide Scraper – https://amzn.to/3tICsE9 (UK)
https://amzn.to/3TJRtQI (US)
SCOTCHBRITE WHEEL – https://amzn.to/3MShMlQ
Bench Polisher – https://amzn.to/3TrHmk2 (UK) https://amzn.to/3CQfFdI (US)
Sanding discs 240grit – https://amzn.to/3sDmeMQ (UK) https://amzn.to/3sBrMYg (US)
Morrells Woodstain (Walnut) – https://amzn.to/3iYpwby (UK)
Morrells Woodstain (Ebony) – https://amzn.to/3WyG351 (UK)
Howards Feed n Wax – https://amzn.to/36OFkqM (UK) https://amzn.to/3K82zdG (US)
Ear Protection – https://amzn.to/3C7YKmc (UK) https://amzn.to/3vCBz2g (US) Respirator – https://amzn.to/3hytSBN (UK) https://amzn.to/3sG64T3 (US)
NOTE: Please be advised that the links provided are affiliate links and I may get a small commission from qualified purchases. This is at absolutely at no extra cost to you! Always be sure to read all manufacturers instructions and use appropriate safety equipment when using any of these products, and do so at your own risk.
#furnituredesign #furnituremakeover #furnitureart #furniturerestyling ##furnituremakeover #furniturerestoration #diy #refinishing #vintagefurniture #restoration #furniturerefinishing #howto
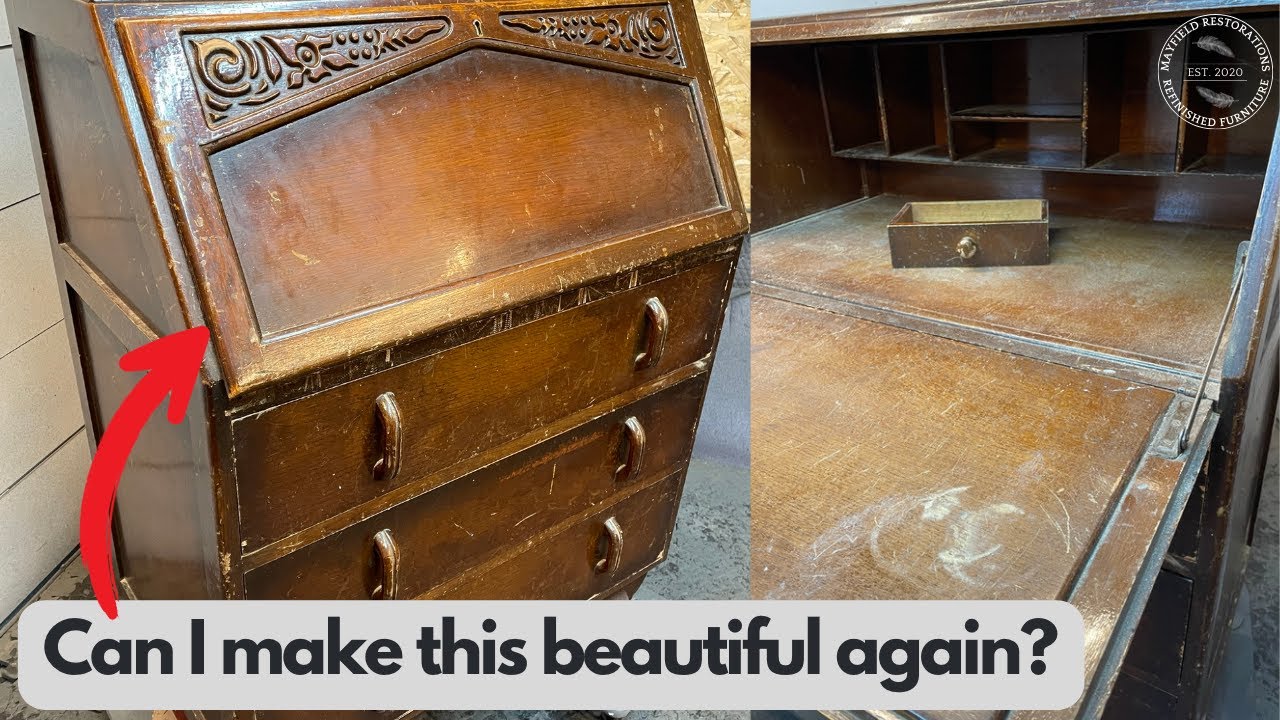
Hi everyone and welcome back In this video we are going to be taking This 1930s Writing Bureau by a company called Gentique which is a guy called Jeffrey Jenkins and apparently this guy used to Be quite a world famous toy maker Before he started designing and Manufacturing furniture and he’s quite Famous for a failed invention of a Water-powered hydraulic Toothbrush Just what everybody needs uh yeah Apparently that didn’t do too well it Was uh super expensive to buy and super Expensive to make so he focused on his Furniture you will see a lot of gentique Furniture this like I say this is from The 1930s and it’s a writing Bureau but He’s probably more famous in the 50s and 60s For his mid-century modern sideboards So this is a Piece furniture for a Customer this was a mother’s furniture And it was loved by her at one point but Unfortunately it spent probably the last Decade In my customers garage being used as a Tool chest so she really wanted to get This restored and I said I would be able To help so stay tuned and you will be Absolutely Amazed by the result at the End of this video [Music]
The finish on this was totally failing As you can see here I think it’s shellac But I’ve never actually been able to Remove a top coat before with my shop Vac so unfortunately this didn’t work For all of the piece just just on the Sides for some reason Foreign [Music] You can just about make out the Manufacturer’s Mark stamped in the back Here so I’m just trying to darken it up So you can see As always I like to start each job by Giving the piece a thorough clean it’s I Guess it’s not really needed in this Case because I am going to strip the Finish but it’s just it’s just part of My process and I like to start with a Clean piece Foreign [Music] So the first job is to remove the Handles from the drawers and Straightforward just screws at the back So remove them and just remove the Handle ready to restore later I’ve done quite a few of these writing Bureaus now and it’s so much easier to Just take it to bits really so I always Remove the drop down desk front so I can Get to the hinges and then there are the Pigeon holes inside Which you need to get at by removing the
Back of the unit which you’ll see in a Second Thank you Foreign You could see me there just trying to See how the pigeon holes inside were Actually fixed to the unit so to get a Better look I’m going to take the back Off As you can see there there were some Screws that I removed but unfortunately It’s also nailed in which which is a Pain really I’m just banging it from the Other side just to try and push the Nails out a bit just so I can get the Pliers on them Unfortunately not all the nails did that And this took quite a while to get off But I got there in the end and you know Didn’t create too much damage The pigeon holes were just simply nailed Into the side of the unit so they were Fairly easy to take out once I got the Back off [Music] [Music] Foreign As you can see there I started to remove The existing finish with the scraper and My sander But I soon dropped that idea because I Had to do these details anyway with the Paint stripper just because you know It’s just almost impossible to get him
With a sander paint stripper in a little A little soft wire brush just to get Into the details and remove that this Actually worked really well this Stripper so that informed my decision Going forward I put the scraper to one side and I then Decided to strip the entire piece which Took me a long time was very messy but Probably would have took a lot longer With the scraper and the sand [Music] Hopefully from that you can see why I Chose to go down the route of using Stripper It it is a messy job and you know it Doesn’t take five minutes it takes a Long time because you have to put it on Wait for it neutralize it put it back on Again if you if you’ve not pulled up any Of the top coat and then neutralize Again so it’s not quick but it’s Probably less time consuming than just Sanding the finish off [Music] Oh Foreign [Music] The top coat on this was was so thick And so dark it actually hid the the Beautiful wood grain in this in this old Piece of furniture and I think it’d be Refinished over and over again over the Years
So it definitely needed dripping back Down to the bare wood [Music] It can’t sit on my knee Foreign [Laughter] Okay yeah [Laughter] This is what I have to put up with Foreign [Music] As I mentioned at the start of the video This has been used as a tool chest so The drawers were in a bit of a sorry State they definitely needed attention And they got completely sanded and Refinished Foreign [Music] Despite the state this was in there was Only really one draw that had the veneer Damaged on it I wanted to try and patch that so I had Some I had some veneer some Edge band Walnut veneer and I was just trying to See if that was a good match I also had Some Oak veneer And I’ve got a big box of old veneer off Cuts so I was just trying to find Something that was suitable [Music] [Music] After trying quite a few veneers I Decided that the the oak would be the
Best once it was stained so all I’m Doing here is I’m just neatening up the Damage By cutting it nice and straight And then it’s just a case of cutting the Appropriate sized piece of new veneer And sticking that in Just make sure that the cut you do is Nice and clean and free from any Adhesive and has got you know it’s crisp An edge as you can manage Foreign [Music] Foreign [Music] Just make sure to remove all the dust That you possibly can I do that with my Vac just to blow the dust off and then Wipe it over with mineral spirits And then it’s ready for stain I’m using My morels Alcohol-based penetrating stain and Again this is another two-tone piece This is the the Walnut color and the Majority of the bureau is going to be in This color but you’ll see shortly it Will have a contrasting color Foreign [Music] [Music] Foreign [Music] For those of you that have watched my Other videos you will know that if it’s
Got a dovetail joint then I am either Going to paint it or I’m going to stain It I just really like how it adds that Little bit of detail to it foreign Just pointing out here some of the sort Of overlap of the the walnuts down onto The area that I’m going to do in a Different color and it’s okay that’s why I did the center Parts first so I could Just sand back those solid wood bits the Next color stain I’m using is the ebony Again it’s a morel’s alcohol-based Penetrating stain and this is what I’m Using to cover the rest of the piece Foreign [Music] [Music] Pools on the bureau were solid oak and They had a lovely rebated section in the Middle so I just removed the old finish Give them a sound just clean them up and Then I did the two-tone design on the Handles just to pick out the two-tone Design of the bureau [Music] The plan for these hinges was to strip Off the old finish clean them up and Then spray paint them but you’ll see in A second once I’d remove that old finish And cleaned them up they were absolutely Beautiful and they stayed like that with No spray paint on them at all Foreign [Music]
The top coat I’m using is a water-based Poly by a company called polyvine to I’m Just spraying that on it’s it’s my sort Of go-to top coat if I’m using a Water-based pulley it just goes on Really nice and I get a really nice Smooth finish So usual procedure I spray with light Coats wait for it to dry And then knock it back with a brown Paper bag just to take off any dust nibs And then it gets another two coats with A rub down in between each coat [Music] All the drawers were pretty dried out so They all got a treatment of the Howard’s Freedom wax just to nourish them and Protect them The little drawer the little pen draw From inside the unit had a bad ink stain On it and I couldn’t get rid of it so I Decided to cover it with some nice green Felt not only did it cover the stain it Just made it look so much better as well It looked like it was always meant to be There Foreign [Music] Just the last few details now and I’m Using some black rub and buff just to Add some black to some of the details of The unit And that’s pretty much it all I need to Do then is add the handles and we’re
Done so I’d just like to say a massive Thank you if you stayed this far and if You feel like I’ve earned it please Subscribe like and share the video it Really helps out the channel if you like It and hopefully you enjoy the final Reveal [Music] Foreign [Music] Foreign [Music] Foreign [Music] Foreign


